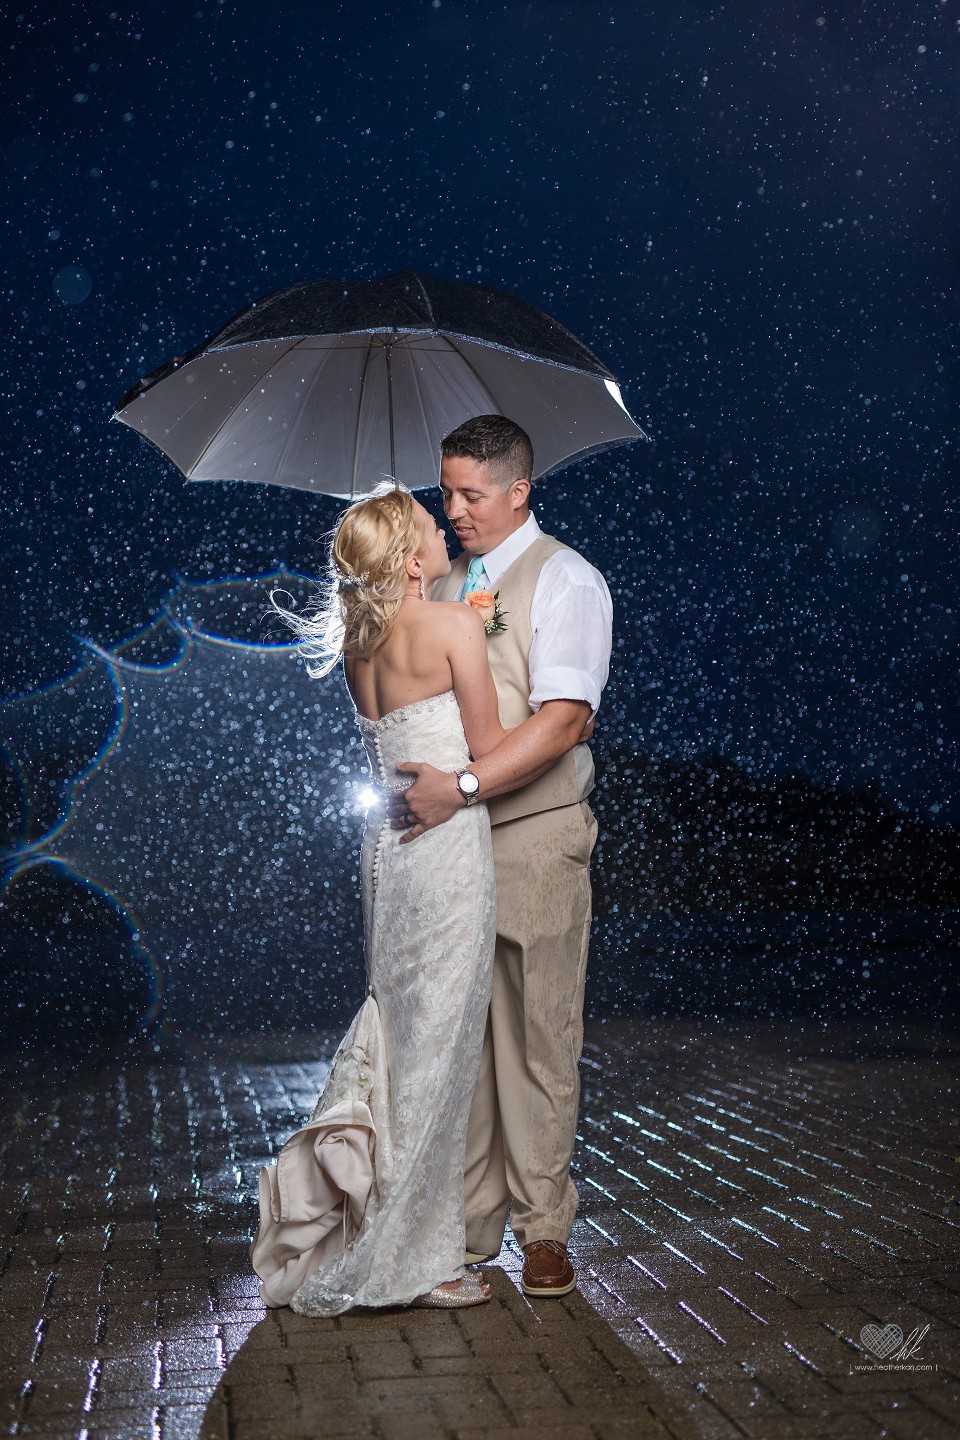
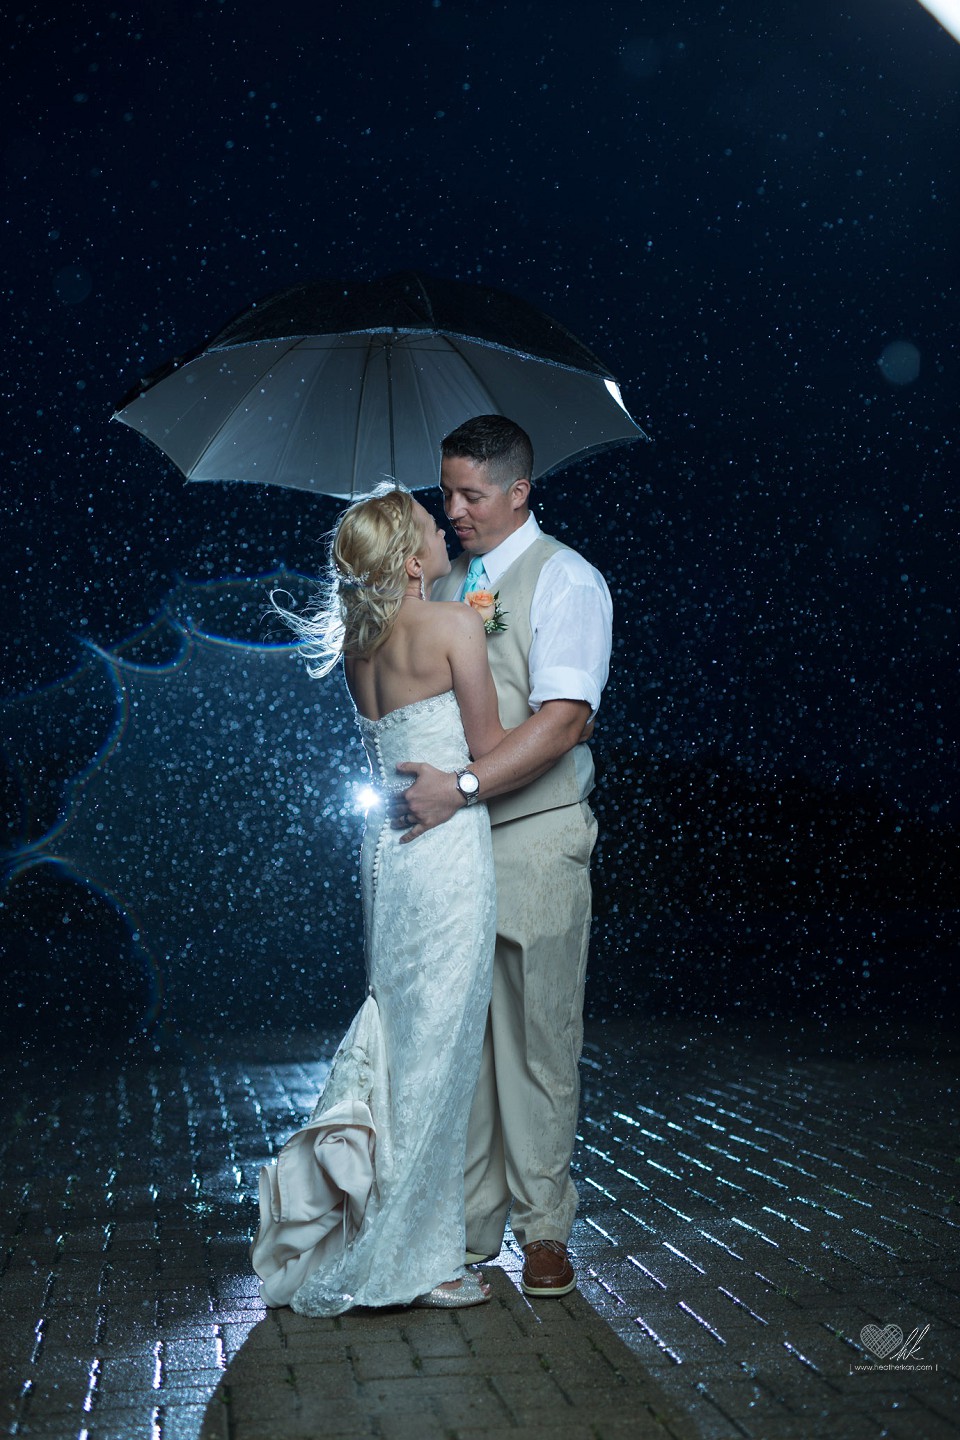
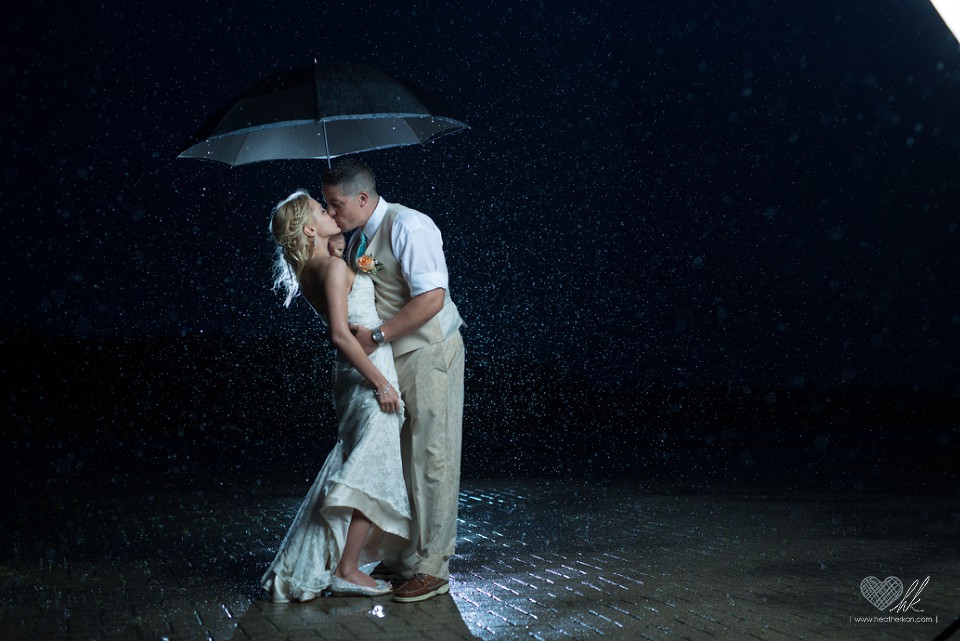
Jami and Jonathan’s wedding ended on a perfect note- a couple of gorgeous images in the downpour Michigan graced us with! 😉 This series of shots took a lot of past experience, planning, and some specific gear (including one VERY wet lighting helper!) to achieve, and is a very proud moment for me!
Having received a ton of questions on how this shot was done, I thought that a detailed post would be the most helpful. 🙂 Let’s dive in!
The Preparations
The knowledge to do this kind of shot isn’t something I figured out on the way to the wedding. 😉
Many years of working with off-camera flash (OCF) made it much easier to plan this shot once I saw what the weather had in store. Nighttime shooting has been a favorite of mine for many years, and something that I talk about- and end up doing- with many of my clients.

My past OCF images were shot using the exact same principles as the rainy shot- and that’s because light always behaves in the same predictable way. The location and conditions might change, but lighting a couple would be the same simple setup that I was accustomed to!
Eventually, past experience makes you faster at adapting your settings to work with what you’ve got! And this is a long journey- never feel discouraged, and don’t give up. 🙂 You’ll get there!
Having that past experience in my mind, I knew that this shot was a possibility. I began to mentally prepare for the shot early in the day. I knew that I would want:
1) A large light source to light the couple (the larger the light source, the softer and more flattering the light)
2) Another light source behind them to illuminate the rain and also provide “rim” lighting (the outline around them)
Knowing that I had several options in the car to do this, I decided that (if at all possible) I would use my strobe and parabolic umbrella for the front lighting, and a speedlight behind Jami and Jon for the rim lighting (more on the specific gear in a moment).
I brought in the gear I’d need into the reception early in the day to ensure that they would be handy (I try to bring a lot of options with me, even if I don’t bring them into the reception and just leave them in the car- I like knowing that they are available should I want them).
I also made sure to prepare my clients. Early in the day, they happily dodged a few raindrops while it was lightly raining on-and-off to get some lovely natural-light portraits- so I knew that they wouldn’t be scared of a bit of water! 😉
During the reception, I made sure to mention to them that I would love to do a rainy-day shot with them, if they were willing to get a tiny bit wet at the end of the night. (they had seen, of course, past examples of rainy and nighttime shots during the booking process) They were enthusiastic, so it was ON! 😀
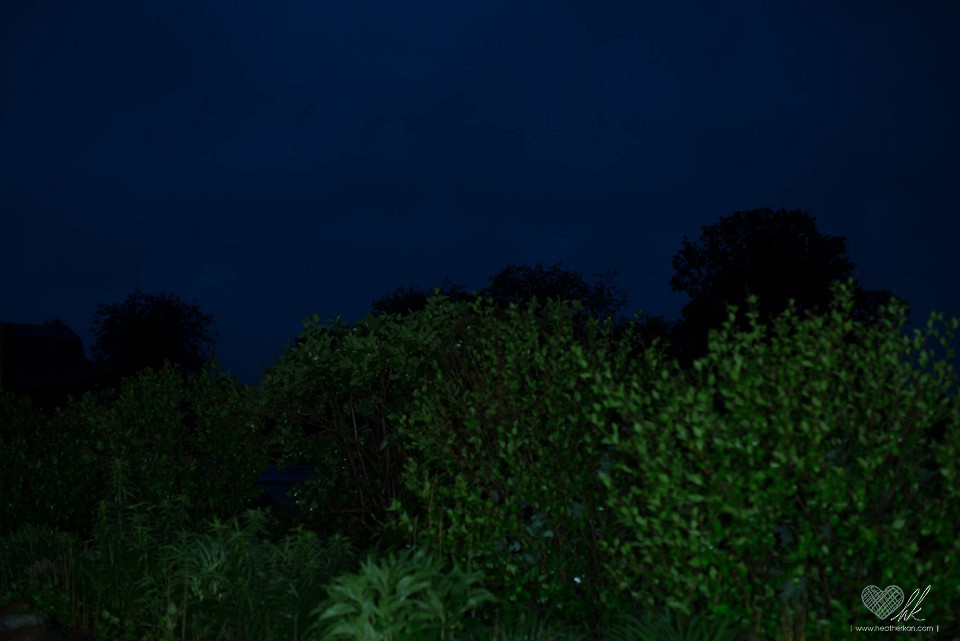
Throughout the reception, I kept an eye on the weather and the level of darkness. I wanted a pinch of light left in the sky, but mostly darkness- so I waited, and shot the reception events…
As the reception went on, the rain intensified. My second shooter, Lauren, grabbed the above shot on the right- showing the lake forming in the parking lot! Behind the lady in the orange jacket is where the rainy shot of Jami and Jon would happen later in the night. 🙂
Finally, darkness fell, and it was time to go out and get set up. (when getting ready for a nighttime wedding shot, I always set up without the bride and groom- don’t want them having to stand around while I do so. 🙂 ….of course, this goes double in torrential rain!)
Lauren and I went out to the parking lot, found a clear area (that is, without cars in the background), and together we set up my gear.
Gear Used
In order to take the shots, I used my Canon 5dmrk3 and my Sigma Art series 50 1.4. The 50mm range would allow me to get a variety of shots- moving my feet a bit, I would be able to get both “close up” and “wide” shots in a short period of time.
The light source(s)
Front light: Since light is most flattering and soft when it is large in comparison to your subject, I decided that I wanted a large, powerful light source. For this, a strobe was just the ticket!
Rim (back) light: In order for the raindrops to show, I needed to have a light behind the couple (plus, I love the look of rim-lighting anyway!). This is a perfect job for a speedlight.
The lightstands
Generally, I use my Manfrotto 5001B 74-Inch Nano lightstands for most of my lighting. These stands are SO awesome! Sturdy but very, very light, they are perfect for speedlights. They fold up small for easy carrying and storage! They have been the most reliable lightstands I have ever owned. So, I used one of these little stands to hold the rim light, behind my couple. Easy-peasy!
Unfortunately, a strobe needs a beefier stand to support it’s weight- so when using a strobe, I use my trusty CheetahStand C12. In fact, I tend to just keep my strobe attached to my CheetahStand full-time to make unloading and setting up easier. 🙂
The Modifiers
In order to make sure that the light in front of the couple was soft and flattering, I would want to use a modifier. Remember, the larger the light source (including the modifier) in comparison to the subject, the more soft and gorgeous the light would be! So, although I have 43in umbrellas and a 48in softbox, I decided to go huge, and use my 86in (7 foot) Soft Silver parabolic PLM bounce umbrella with a white diffusion panel from Paul C Buff.
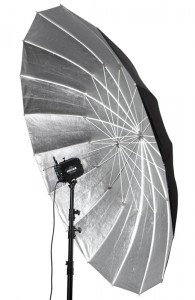
I chose to buy the silver bounce version because (1) the fact that it’s a bounce umbrella means that it’s “collecting” more of the light, directing it to where I want it- unlike a shoot-through, where a lot of light scatters around where it’s not needed, and (2) because the silver also adds to the ability of the light to bounce back in full force, rather than dissipate a bit. Overall, this is a great choice for powerful light- which tends to be of a better quality.
I also additionally bought the matching white diffusion panel because diffused light is a softer, prettier light. 🙂 (think of the difference between direct sunlight and a bright but cloudy day!)

Unfortunately, this thing is HUGE and very hard to set up during a hurricane, haha!! It took both Lauren and I, working quickly, to set it up under the rain. Thankfully, the shape and setup of the umbrella meant that the strobe would be totally covered and protected from the rain, which is another reason why I decided to use it over the other modifiers that I have, which would have left the much more sensitive strobe in the rain directly.
Once it was set up, it did provide a tiny bit of protection for me while I got my shot settings dialed in! Lauren was not so lucky, as she had to stand behind the strobe and stand, to hold it down in the crazy wind.
The Setup
I tend to use the same basic two-light setup as my “base” when doing nighttime shots. Depending on the situation, I may add more lights or adjust things, but the “base” is typically the same- and this shot was no different!
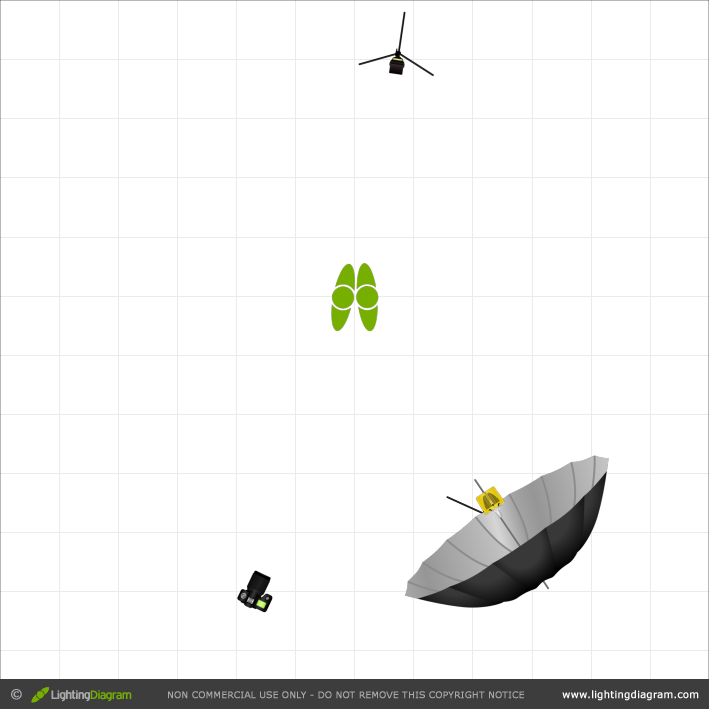
My “two light recipe” is: (1) place the main light on one side of the subject(s), angled in toward them, (2) I stand on the opposite side of them, and then (3) I then place my rim light about 6 feet behind the subject(s), really low on the stand, angled up into the elbows of the subject(s). I place the rim light at an angle where it will hit their backs and not get in my shot. (another way to think of it is that my subjects are in between me and my rim light)
Why angle my main light / why not have it right near or above me?
In order for a image to look natural and flattering, you want your main light to be at an angle that allows your camera to “see” shadows. NOT being able to see shadows on a face erases the dimension of the human face and is primarily responsible for that “OMG FLASH!!!” look that you see from on-camera, direct flash. 😉 (an excellent breakdown of this, including examples, is found here on the Strobist 102 page– an AMAZING resource for learning how to light)
Bonus tip: when shooting couples, I often try to place the male subject on the side that the main light is, so that more light hits him and dissipates a tiny bit before hitting the female subject. This serves two purposes: (1) it tends to make the female appear slimmer (since a bit more of her is in shadow) and the male look bigger (which is typically more desirable for most couples) and (2) if it’s a wedding, the white dress will be in less danger of being blown out.
Why six feet behind the subject for rim light? Why at a low height and angled up?
Because reasons. 🙂
Kidding, kidding… it’s not really a hard rule- this is an art, not a science. 😉 Six feet is a good general spot to place it because the light gets to spread far and wide before it hits my subject, ensuring that the rim light makes it around their bodies nicely. It also makes it easier to hide the stand, and easier not to blow out the subjects.
I like to set it low and angle it slightly up (shooting into the elbows of the subject) because (1) I don’t want to aim down and light up the ground too much, that’s distracting and can blow out the ground, which is annoying to fix, and (2) I want the primary strength of the rim light to be on their upper bodies. While I want the rim to touch the legs as well, I don’t want it to be as strong there- I want the attention to be pulled up to the faces.
The Settings
With this setup done, it was time to get my settings down! Personally, I find the fastest and easiest method is the ‘ol “take a shot and see how it looks” school of thought. 😉
So, when I’m about to take a nighttime shot, I use my past experiences and knowledge of the exposure triangle to take a stab at the settings. Often, I first take a shot of the ambient, balance my camera settings for that, and then add flash and balance in the flash settings with the ambient (more on that great and simple technique for beginners is detailed here). But in the rain, you have to move quick! So, I simply dialed in some “guesstimated” settings, and then took a few shots with the flash on to see how it looked.
This was my thought process:
– Goal: Perfectly sharp, gorgeous backlit set of differing images, with flattering front light and good (at least) posing, quickly. –
1) I knew that I wanted to avoid camera shake. I am a MASTER at getting camera shake- like, I can make a blurry shot like no one else haha! So, I knew that I’d want to start at my highest possible shutter speed- 1/200th- in order to give me the best shot at a perfectly crisp image. (why is 1/200th the highest I could go? Read about sync speed right here)
2) I wanted a fairly thin depth of field, since the objects in the background weren’t super attractive (signs and such- it was a parking lot after all). I also wanted the rain to be tiny spots of bokeh instead of being in sharp focus. So, f/2 it was!
3) With my shutter speed and f stop set, I had to pick a ISO. I wanted a touch of the night-blue sky, so I picked that ISO that, combined with the other settings I already choose, would get that done: ISO 160
4) Finally, time to decide on flash settings. I simply went with the lowest setting on my strobe- 1/128th (a good place to start, it’s strong!), and for the backflash, I would use (if I am remembering correctly!) about 1/32th power.
With those settings dialed in, I took a quick snap of some grass at my feet… here’s the SOOC (straight-out-of-camera shot- no editing). [9:08pm]
Exciting, lol! 😀
I knew I was fairly close with this. I saw some blue in the sky, and the grass wasn’t blown out. Time to shoot the ground where I actually would be standing- and to test on a human subject. (more SOOC)
(note that I didn’t have my backlight setup in the spot at this point- I nearly forgot it!)
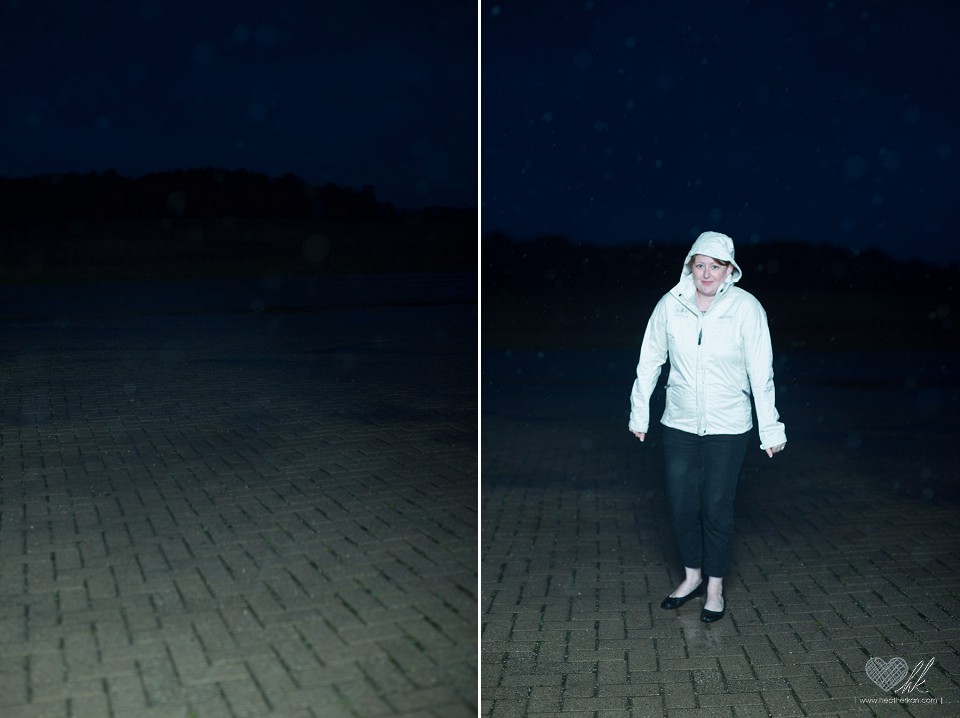
Yay! Nearly spot on. 🙂 Lauren was a tad bright, so when I ran back to grab the couple, I mentally decided to have them stand a tad bit farther. I outran the couple (not hard to do when one is in a wedding dress haha) and set up my backlight, while Lauren tried desperately to hold down my sail of a parabolic umbrella. 😉
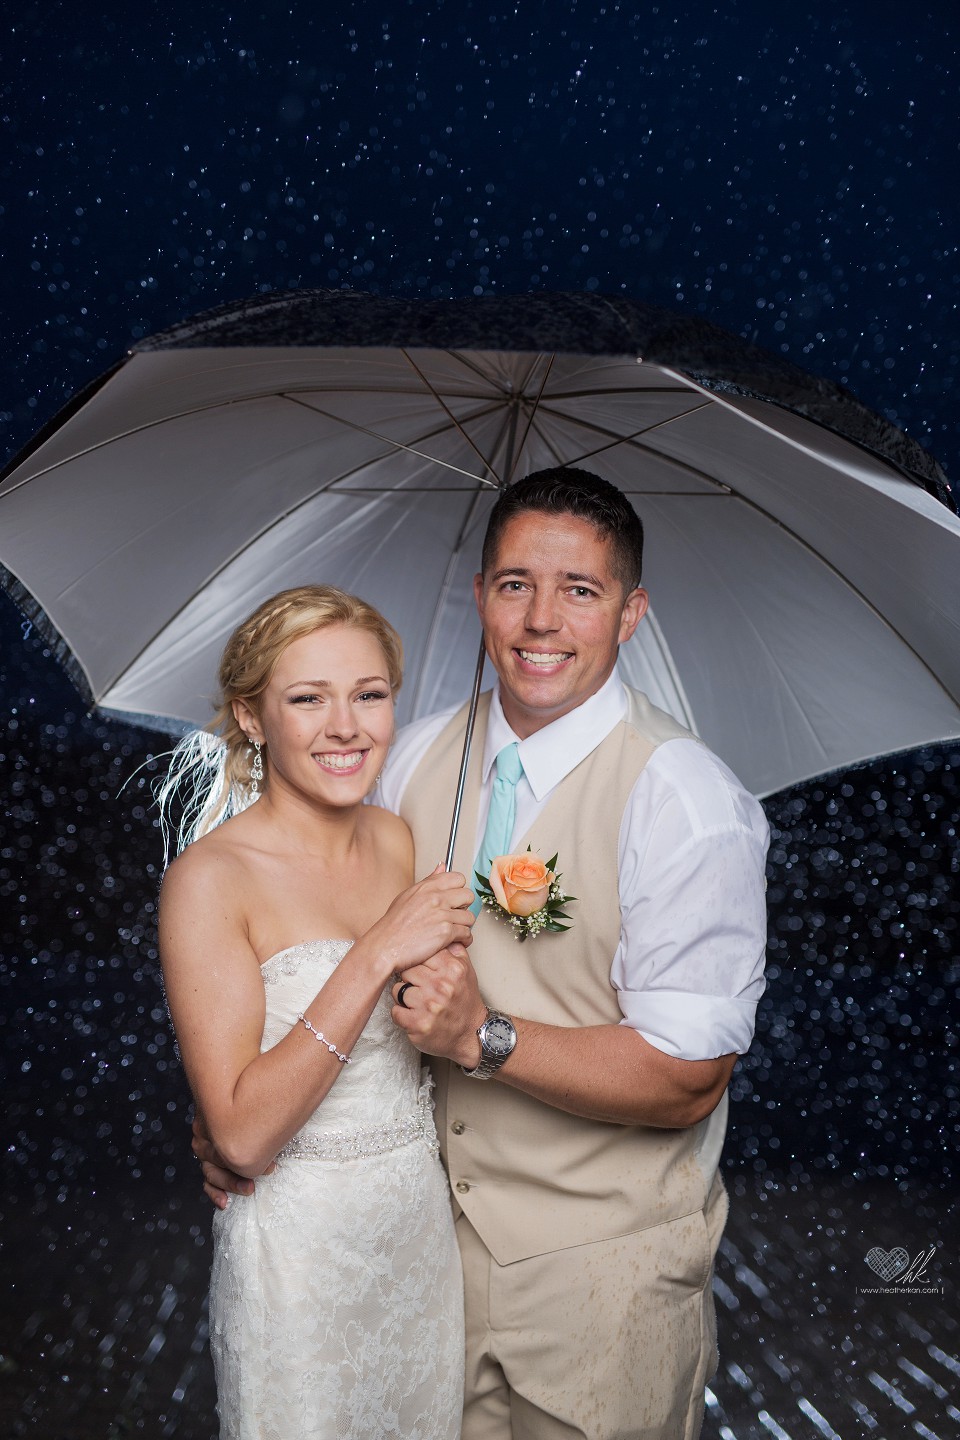
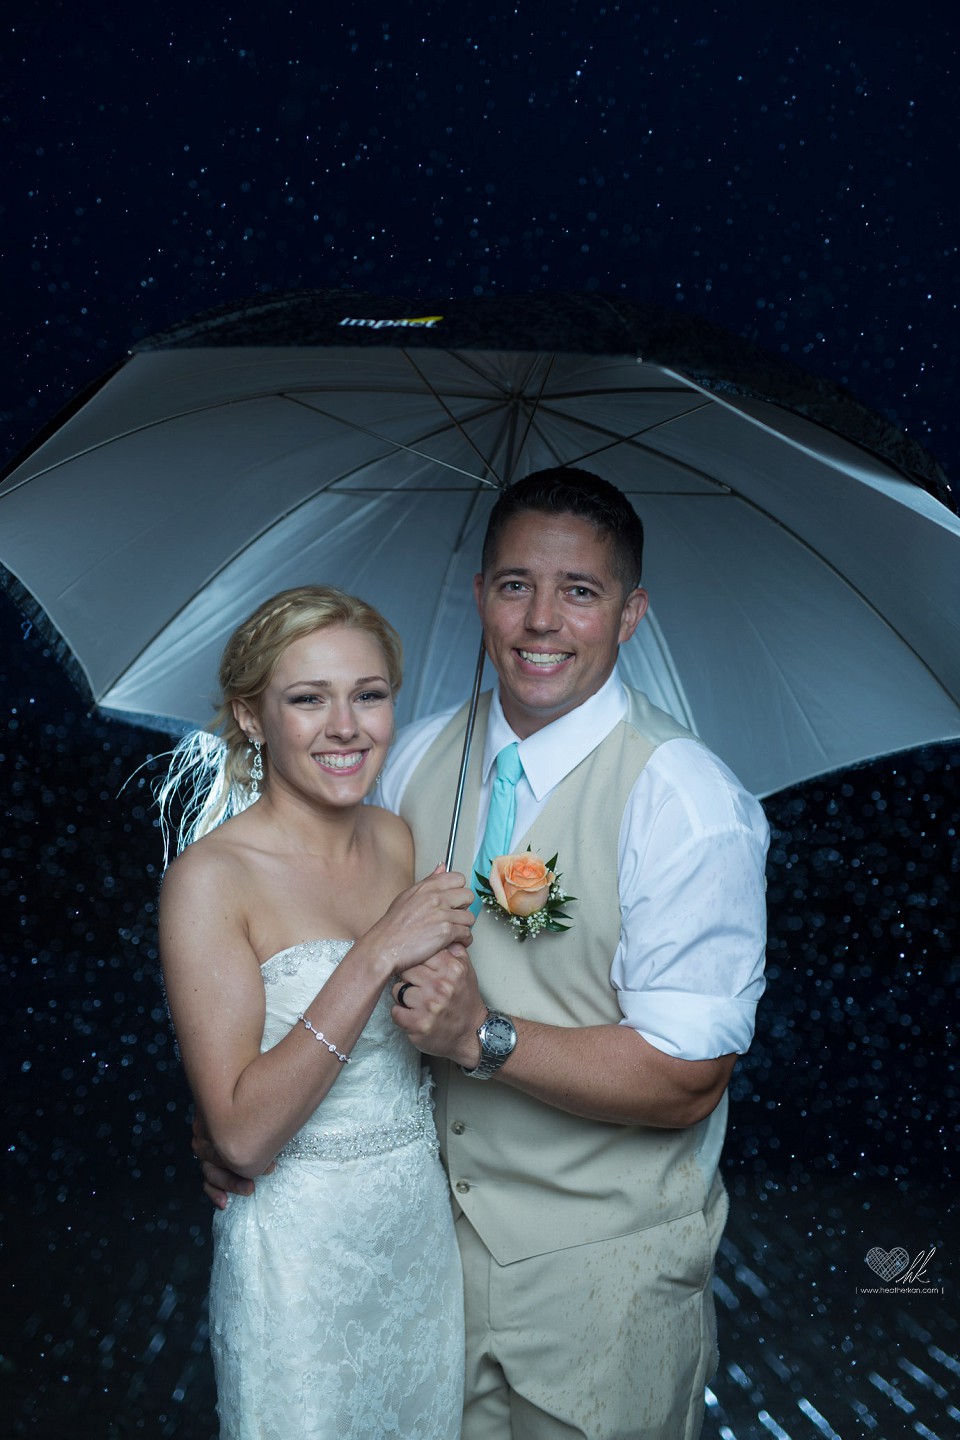
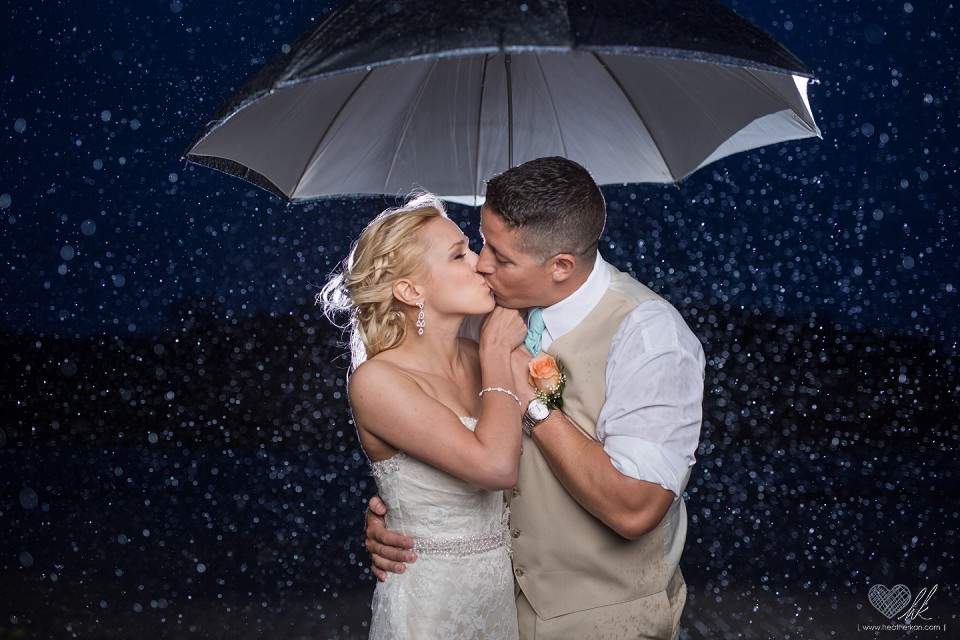
I gave the couple a bounce umbrella to hold- both to keep them dry and because I thought it would be cute. 🙂 The choice of a bounce was deliberate- I wanted the light from both flashes to hit and reflect a tiny bit off the white surface, helping to “fill in” their upper bodies- but I didn’t want to use a totally white shoot-through, because the umbrella as a whole would be super white and take away a lot of visual interest from the couple.
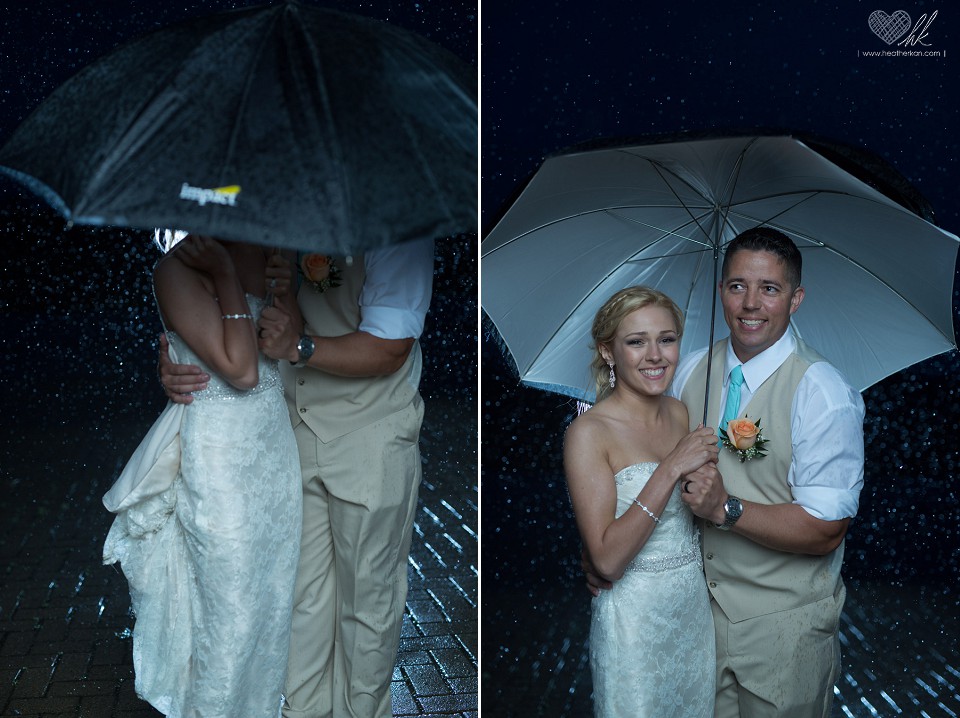
I fired off a few shots to see how it all looked. Totally out of focus and not yet posed- but the lighting looked great! 😀
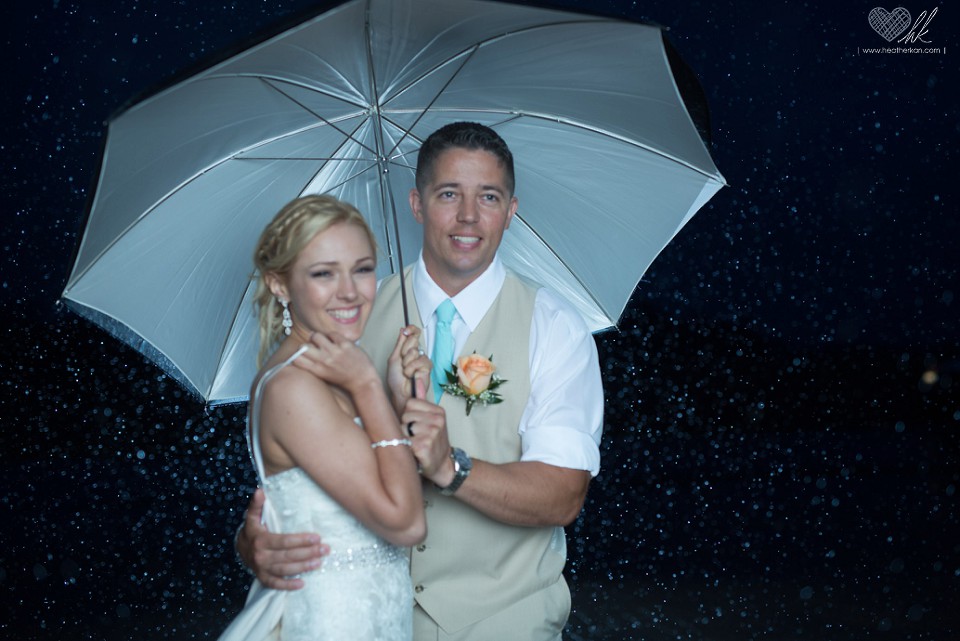
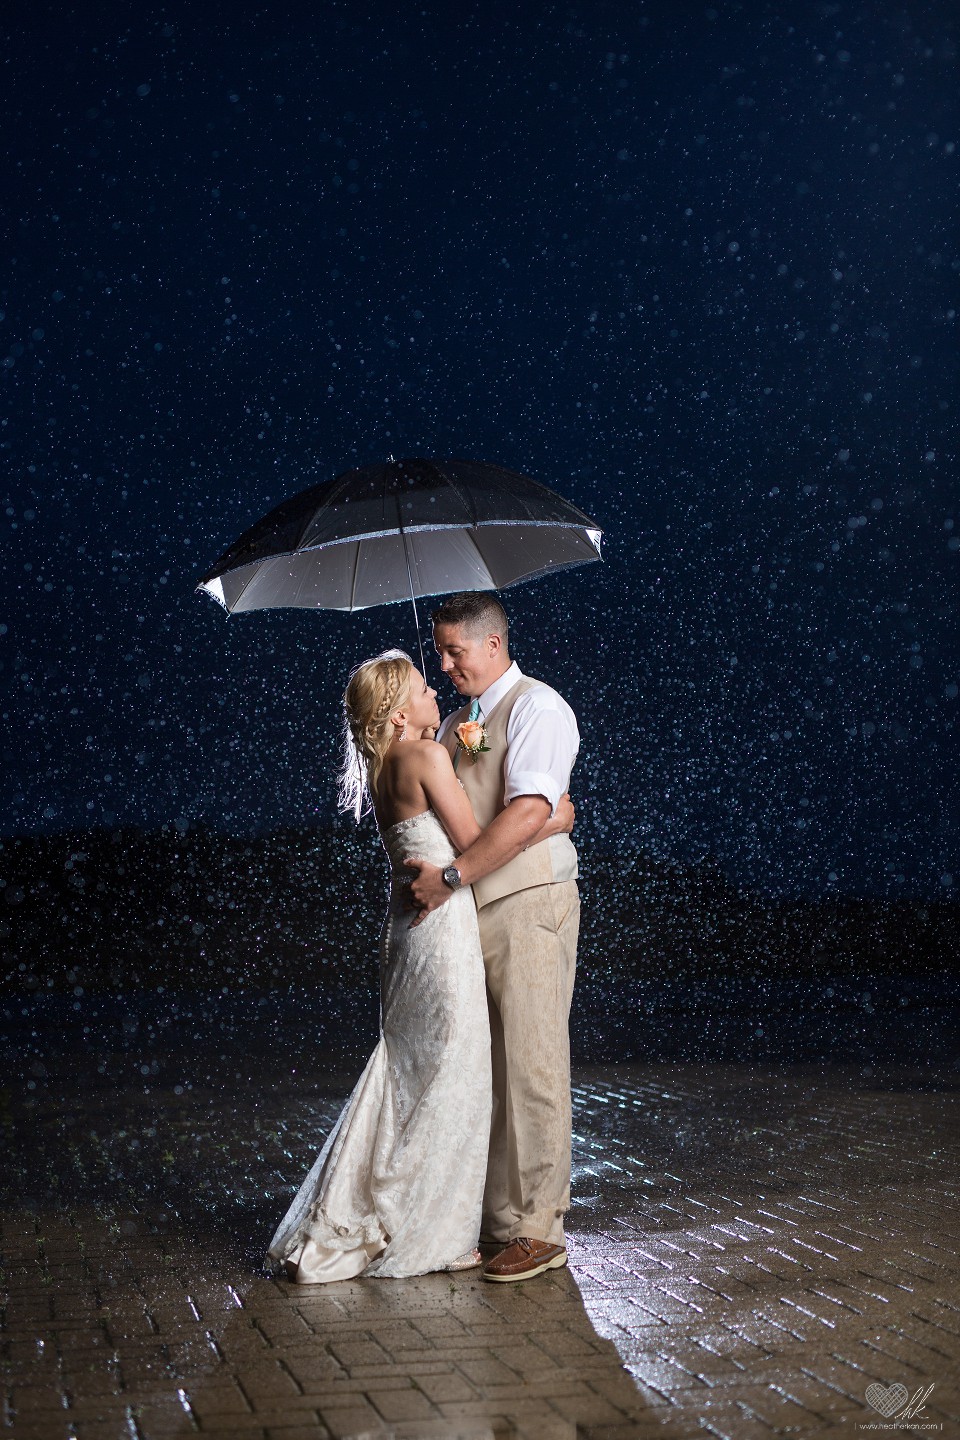
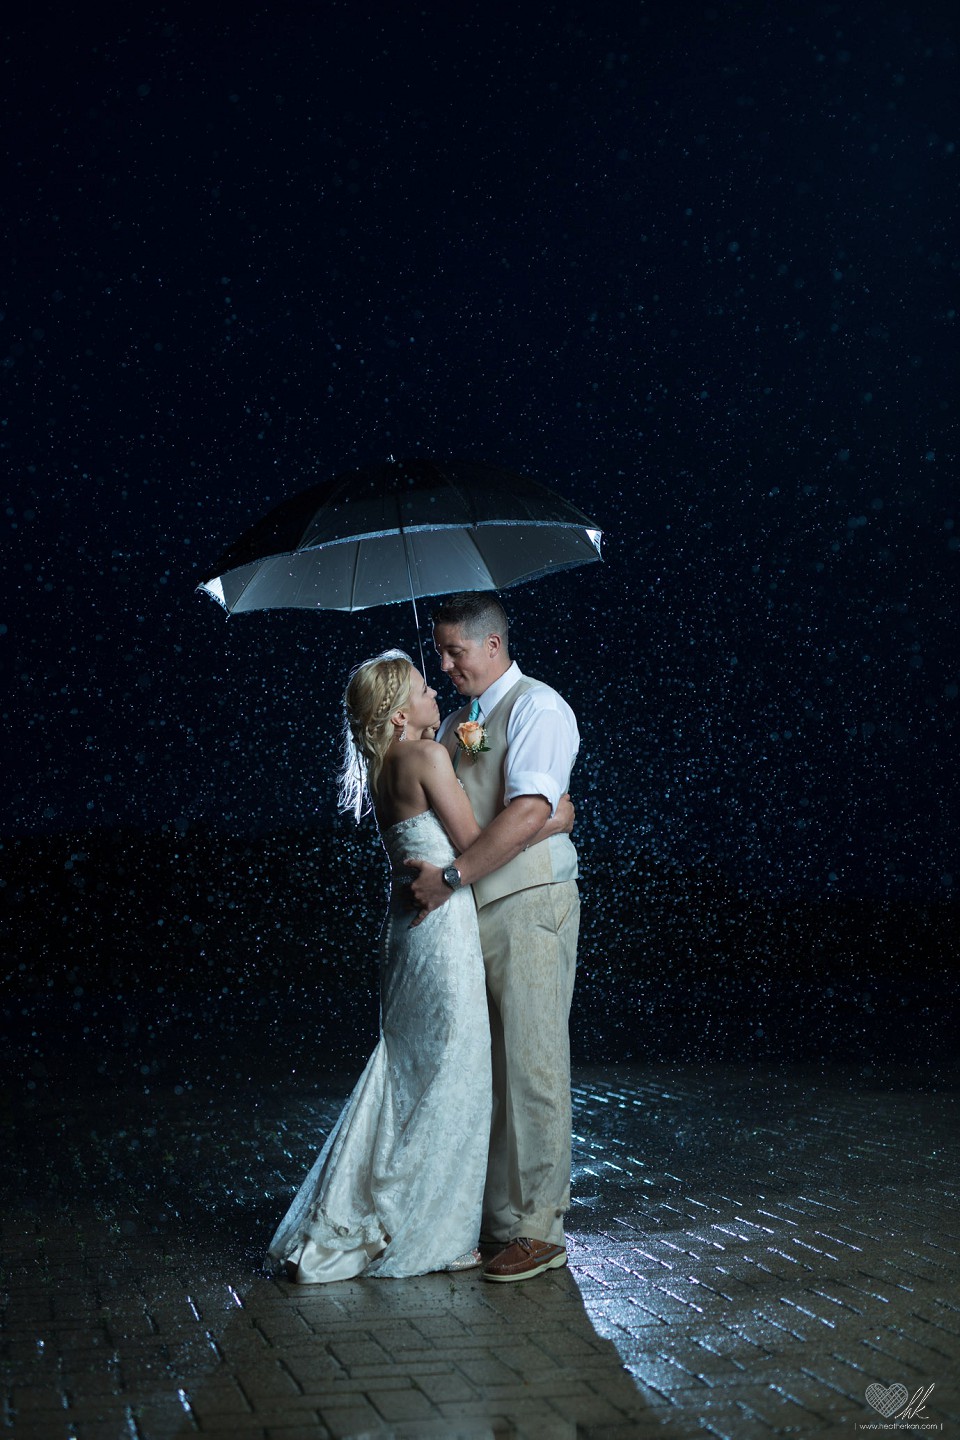
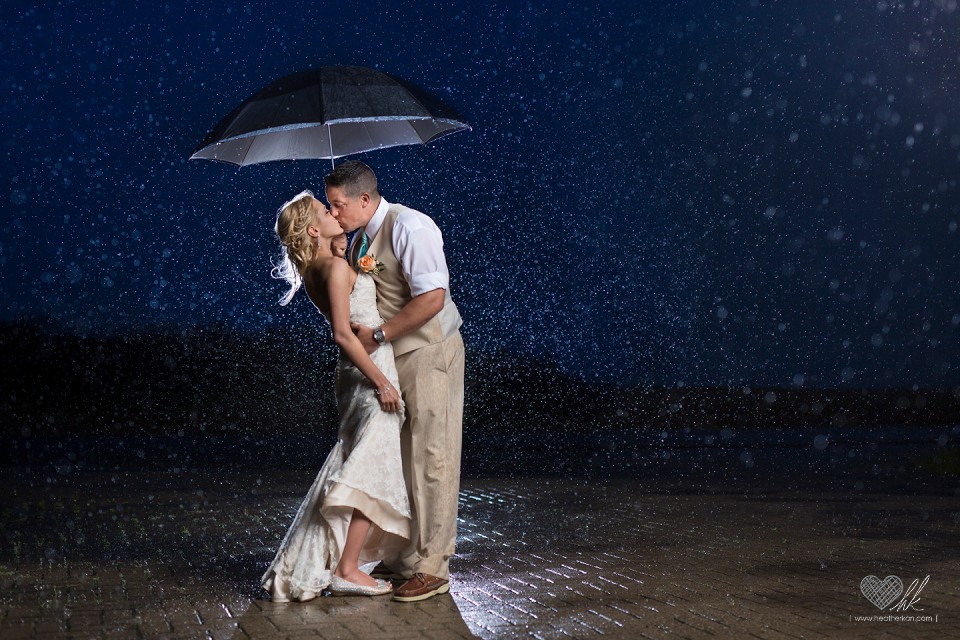
Time to do this for real! I shouted over the storm with some posing instructions, which Jami and Jon absolutely NAILED.
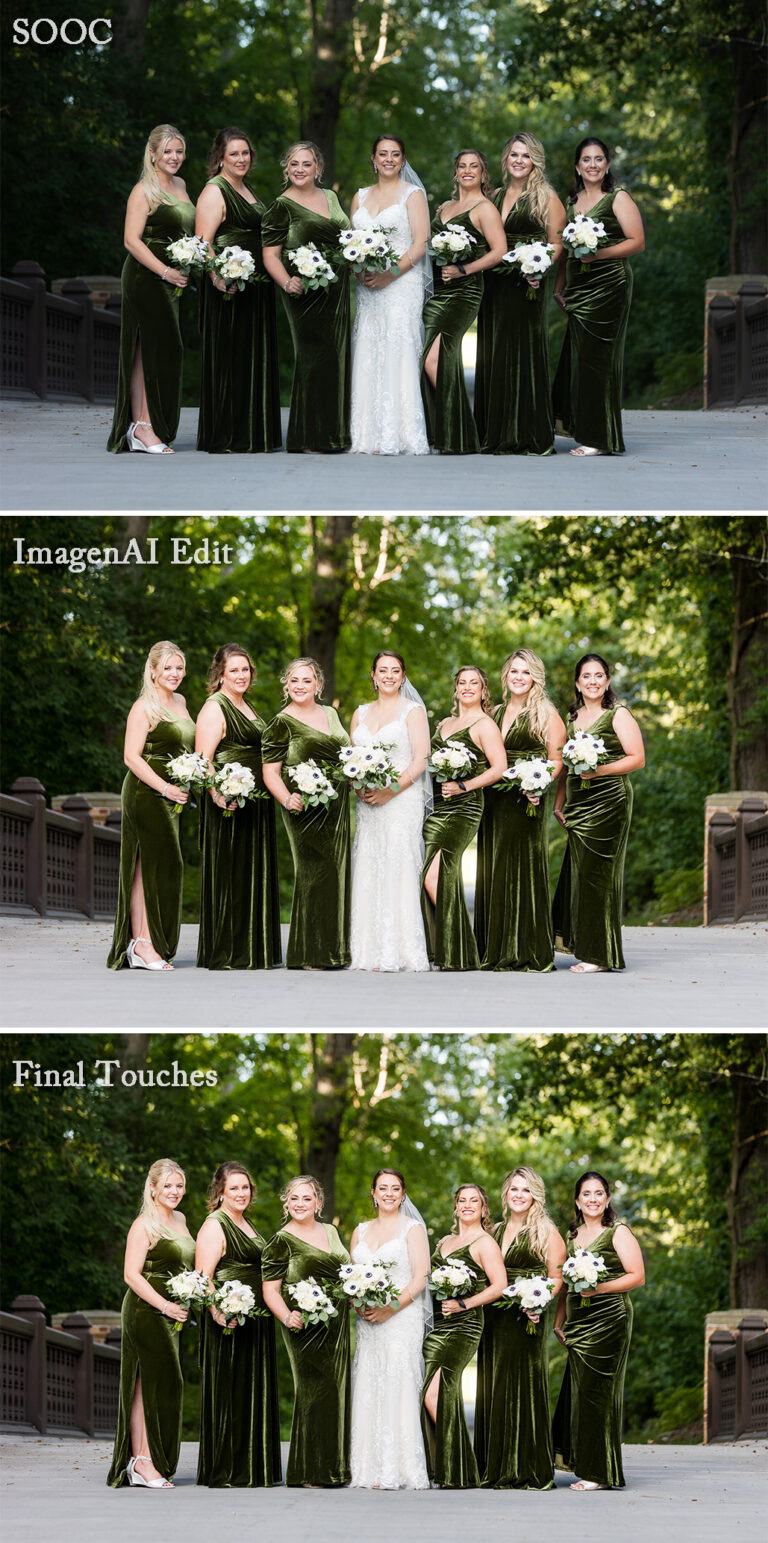
With all the tech stuff in place, it was time to have fun! 😀 (use the sliders to toggle SOOC and edited versions!)

FAQ
Do you always use your strobe for nighttime or reception shots?
No, I often use speedlights- it all depends on how much power I need, how long of a walk it is, and how close my car (with my strobe in it) is parked. 😉 Speedlights are deceptively powerful!
How did you get these in focus?
Good question- it wasn’t easy! I’m VERY particular about photos being in focus, and I was tempting fate with f/2.0, so I had to be careful. The 5dmrk3 has a “live view” option which helps tremendously in times like this! I could turn on live view, hit the magnifying glass button to zoom in to 100% on my subject’s eyes, and then manually focus to ensure that I was dead on.
I use back-button focuing, which means that the camera wouldn’t try to hijack my focus choice when I press the shutter (more on that technique here). I also knew how much I could recompose without falling back out of focus, so I was able to generally get a few different shots before re-focusing.
How come the raindrops look like that?
.. like what? Crisp and easy to see? That’s the combo of the rim light and the depth of field that I choose. In order for the camera to see the rain droplets, you really need a light behind them. (you also need a fairly fast shutter speed to keep them as droplets instead of “lines” of rain. Had I wanted “lines”, I would have slowed my shutter)
The depth of field that I chose (f/2) meant that while some drops are small and crisp and in focus, others are background bokeh- and like all bokeh, they appear as interesting circles of various sizes. 🙂 This was the look that I wanted.
Why not just backlight the couple? I see that a lot..
Part of the answer is the last part of the question: that’s a common way of doing things, but it’s not always good to follow the crowd. 🙂 (plus, some folks only shoot it that way because they don’t know how to light the couple in this way)
My style is very crisp, clean, and carefully lit. I always try to expose my subjects in a flattering, fairly even light- it’s just my way of shooting. (This being the case, it’s also what my clients expect!) I happen to love this kind of light and very much prefer it.
No rain cover?! Did you use a lens hood to protect your lens from the rain at least?
…well… dang, that’s a good idea. *stokes chin thoughtfully* Nope, but that’s a great way to keep rain off your lens. I did my best to angle my lens in such a way so as not to collect water in it, though. 🙂 Thankfully, the rain was mostly blowing sideways rather than straight at me. 😉 (in all seriousness, I did think of a lens hood, but I simply didn’t have it with me. I lose hoods almost as soon as I buy them, sigh…)
Can you teach me how to use off-camera flash?? I find it intimidating!
I completely understand- I’ve been there, too! (and those super math-based calculus filled websites about how to light didn’t help any with my fears haha!) I do teach one-on-one shooting and lighting mini workshops in the Mid-Michigan area, and I would LOVE to teach you how to do what I do! Click here to find out about my personalized OCF classes.
…But, I’m not in Michigan 🙁
That’s okay! My class is offered in person OR via Zoom. 🙂
I really appreciate this article!
You’re very welcome!! 😀 I love to help people learn! Please go and make some magic, and drop me a message on FB so I can see your resulting shots, I’d love to see them!!
Happy shooting!